
How’s everyone doing? Hangin’ in there? Good. Me too. Home life’s getting stressful, but that’s to be expected with the self-isolation. The kids and I did need to get out, so we went for a jog. Speaking of which, if you ever want to feel old, go jogging with a 5 year old. But for the most part, I spent this weekend attempting to recover physically and emotionally from attempting to work and homeschool full-time simultaneously, so I didn’t touch a pencil. My main take away from all this, so far, is that we weren’t made to live like this.
But hang in there. This won’t be forever.
And now to the point. I’ve already written a post about how I make some of my artwork, so it only follows that I should write a on what I use to make some of my artwork. Since I consider myself more of a drawer than a painter, I’ll start with those tools.
IN-STUDIO TOOLS
I have always tried to keep my tool sets really simple and stripped down. A great deal of the creativity of art comes from the restraints you’re under (whether self-imposed or imposed by others/circumstance), not to mention, we’re just drawing here. No reason to get wasteful of cash and space. Find what works for you, and stick to that.
The tools that I use in my studio (or as my kids like to call it, the “dinner table”) are as follows:
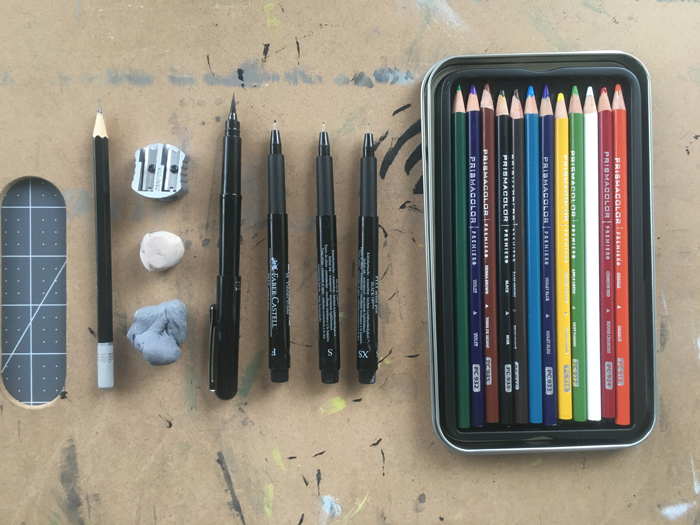
- HB Pencil. For the vast majority of my work, this is the only pencil that I use. I know a lot of artists like to use colored pencil to sketch in, but I grew up using a No. 2 for everything, and this is the closest pencil to that that has the least amount of smudging and smearing, which is important to me, as the flat of my hand has a tendancy of getting all over the place.
- Pencil Sharpener. Because X-acto knives are for cutting paper and board to size. You’re not impressing anyone.
- Hard white eraser. For me, this is the most successful tool for removing pencil lines, without discoloring the paper. You do, however, need to be mindful of whether there is any ink residue on there (after you’ve used it after you’ve inked a drawing), because that will smear on the paper if you’re not careful. So just keep a scrap of paper on the side where you can rub that off.
- Kneaded eraser. This one’s great for just knocking some pencil work back rather than fully removing it, or for lightening a section of colored pencil for highlights. It’s also an absolute must if you’re working with charcoal.
- Pens. This is the most important set of tools for drawing in my opinion. Every pen has it’s strengths and weaknesses, and which one’s you use will help to shape your style.

- My workhorse is the Pentel Pocketbrush brush pen. It’s a super solid brush, is fairly easy to control while giving expression to your line work, takes replaceable ink cartridges, and I can get it at Michaels. The ink is waterproof, as long as you don’t try to drown it and give it enought time to set, so I’m able to use it with watercolors and markers. It’s awesome. I use the technical pens to suppliment the brush pen, and the brand I use for finished work is Faber-Castell, not because they’re the best (I actually like Microns better), but because their ink’s blackness most closely matches the Pocketbrush. I use an F for contour lines for inorganic props (like machinery) and sets, and S and XS for fine details and hatching (the XS specifically for hair).
- The final drawing instruments that I use are Prismacolor pencils. In keeping in line with pairing things down and keeping the setup simple, I’m only working with the standard 12 pack now, and I mix my colors on paper. They also come in handy for adding detail, texture, and shading to watercolor or marker base colors.
- Drawing boards. I’ve got a portable one that I can clamp paper to and work flat on the table or on my knee on the couch (pictured here), and a larger adjustable-tilt board. I only use the latter for drawings that will take multiple hours or days, because the tilted surface saves stress on my back. But if that will then need to get inked, I’ll switch it to the portable board, because I only like to ink flat.
- You may have noticed something missing, and that’s a ruler. I only use rulers as a straight edge to assist me in cutting paper down to size, because I firmly believe that an artist shouldn’t need a ruler after they’ve gotten past high school art.
TRAVEL TOOLS
I also keep a separate, smaller set of tools bagged up if I ever want to sketch outside of the house. When doing so, I grab one of a handful of sketchbooks laying around and take these:
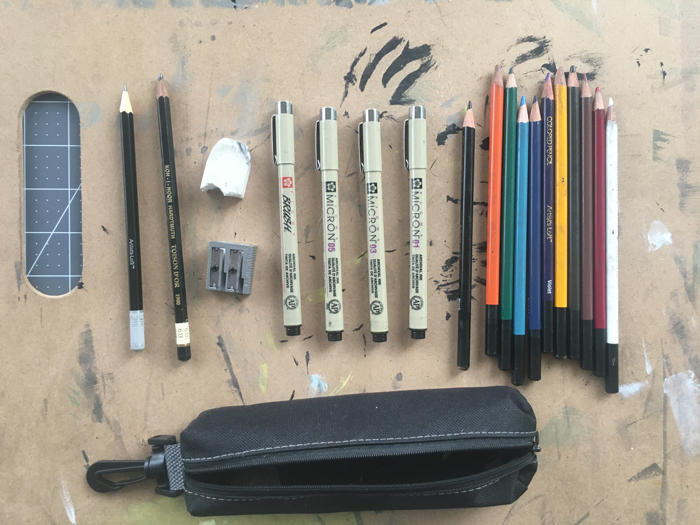
- HB pencil. Still the main deal.
- 6B pencil. In case I want to top keep it just a pencil drawing, I’ve got this softer option to add value.
- Hard white eraser
- Pencil sharpener
- Picma Micron pens. I’ve added their brushpen to the .05, .03, and .01. It’s not great, but the ink’s the same color, and anything I make with these tools I consider a sketch, so it gets the job done.
- Artist’s Loft colored pencils. These are the generic brand offered at Michaels. I have much larger set if I want to do more intense coloring in my sketchbook. But for the most part, this travel set does the job just fine.
PAPER

Right now, I’m loving working with Canson’s Bristol and Mix Media papers. I use the Bristol for pencil only (including colored pencil) work, or drawings where traditional means end after inking, and the coloring/painting will be done digitally after scanning. I use the Mix Media paper when I think there may even be the possibility that I’ll want to add watercolor after inking. This is the paper that I’m using for all of my Inktober 52 animal drawings. But why 14×17 pads? Because I can easily cut it down to 11×17 or 11×14, which are standard frame sizes, which also just feel the most comfortable for me to draw on.
WRAPPING UP
That’s it. That’s all that I need to make some good drawinings. You don’t need a lot, and you can get everything you need (or at least what I need) at Michaels, and you know you’re going to get all of it at 40% off or better.
PROJECT UPDATE
- To do my part in bringing a little creativity and fun into these troubled days, I’ve collected a bunch of my Solving Problems (still need a better title…) ink drawings into a print ready PDF so that kids (or you!) can print it off at home and use as coloring pages. You can download it for free here. Have fun!
